What future advancements are expected in block machinery for engineering applications?

Future advancements in block machinery for engineering applications are likely to focus on several key areas:

  1. Automation and Robotics: Further integration of automation and robotics will enhance efficiency and precision in block production, reducing reliance on manual labor and optimizing production processes.
  2. Innovative Materials: Exploration of new materials and additives to improve the performance, durability, and sustainability of blocks produced by machinery. This includes utilizing recycled materials or incorporating nanotechnology for enhanced properties.
  3. Smart Manufacturing: Implementation of smart technologies and IoT (Internet of Things) sensors to monitor machinery performance, optimize operations, and enable predictive maintenance for increased uptime and reduced downtime.
  4. Customization and Flexibility: Advancements that allow block-making machines to easily adapt to various block designs, sizes, and finishes, catering to the growing demand for customized construction solutions.
  5. Energy Efficiency: Continued focus on energy-efficient designs and processes to reduce the environmental impact of block production machinery, potentially incorporating renewable energy sources into operation.
  6. Modularity and Scalability: Development of modular systems that allow for easy expansion or adjustment of production capacities, enabling scalability to meet varying demand levels.
  7. Improved Quality Control: Integration of advanced quality control measures, including real-time monitoring and inspection systems, to ensure consistently high-quality block production.
  8. Advanced Software and Simulation: Enhanced software tools and simulation technologies that assist in design optimization, material selection, and process simulation to improve block quality and production efficiency.
  9. Environmentally Friendly Practices: Emphasis on eco-friendly manufacturing practices, such as reducing waste, minimizing water usage, and lowering carbon emissions throughout the block production process.
  10. Integration with Prefabrication and Construction Methods: Further integration of block machinery with prefabrication and construction methods to streamline building processes and support innovative construction techniques.
  11. Collaborative and Adaptive Systems: Development of adaptive systems that allow block machinery to collaborate seamlessly with other equipment or robots, facilitating a more integrated and efficient manufacturing process.

These advancements aim to make block machinery more efficient, versatile, and sustainable, catering to the evolving needs of the construction industry for reliable and innovative building materials.

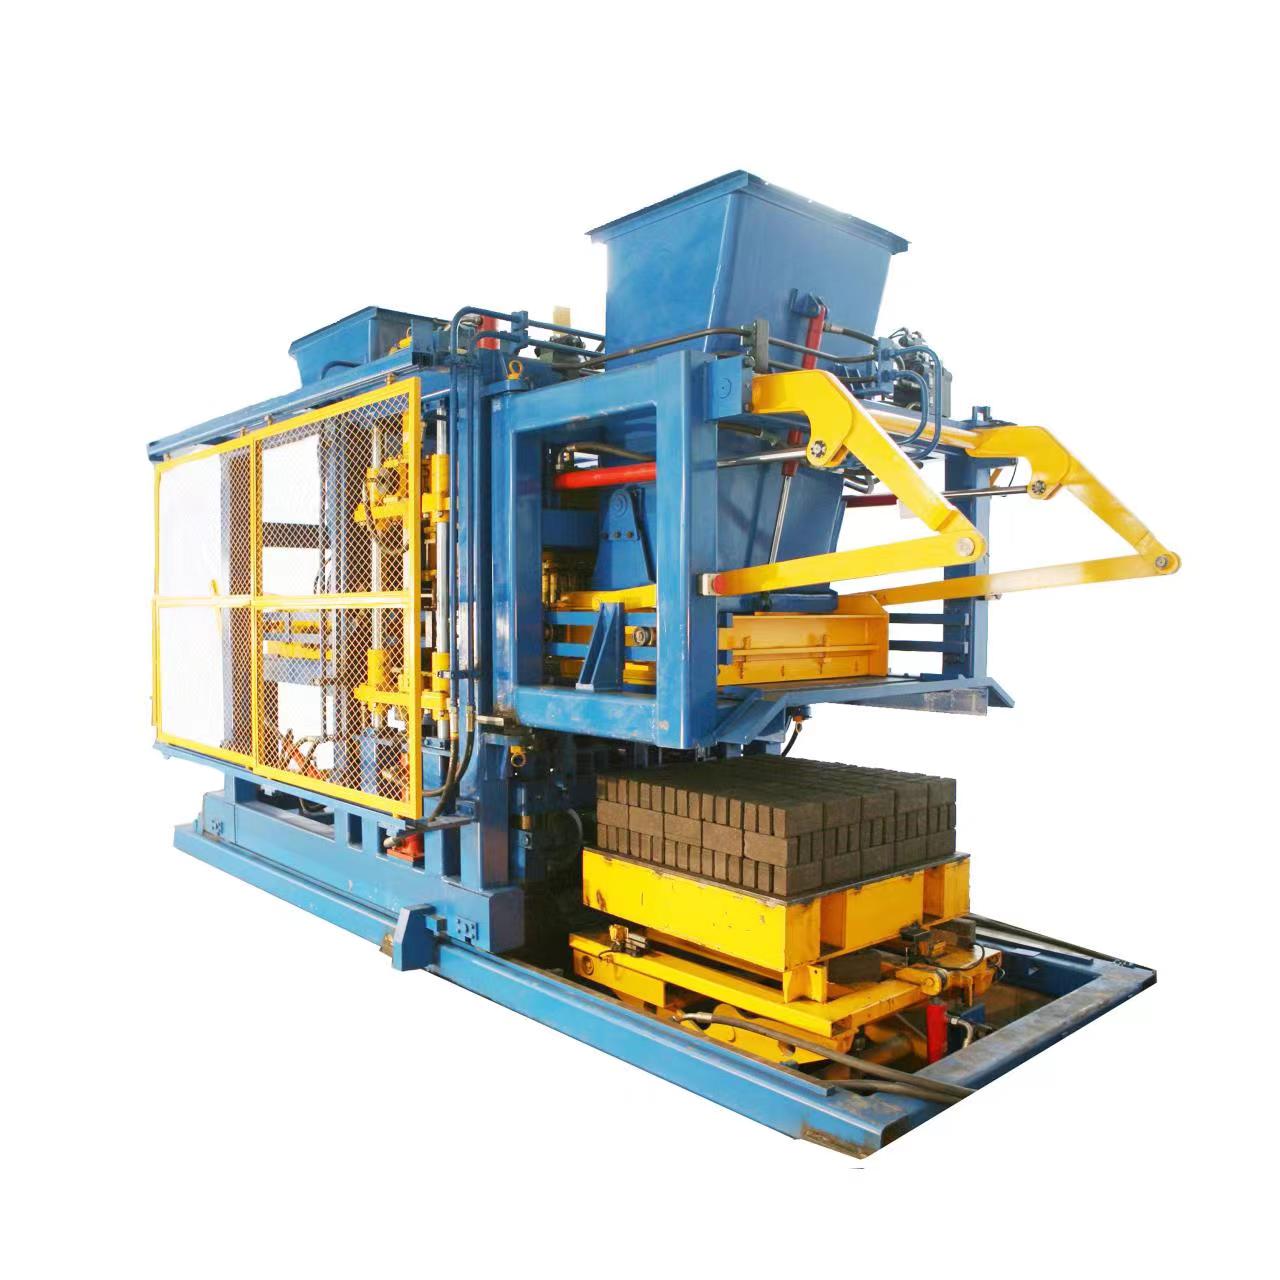
How are block-making machines tailored for specific construction regulations and standards?

Block-making machines are adapted and tailored to comply with specific construction regulations and standards through various measures:

  1. Material Compliance: Manufacturers ensure that block-making machines are capable of processing materials that meet construction standards and regulations. This includes using aggregates, cement, and other components that conform to specified quality and strength requirements.
  2. Design Standards: Block-making machines are engineered to produce blocks that meet design standards for dimensions, compressive strength, density, and durability as outlined by construction regulations. block machinery Machines are calibrated to achieve consistent block properties.
  3. Quality Control Systems: Incorporation of quality control mechanisms within the machine ensures adherence to regulations. These systems may include sensors, monitoring devices, and automated processes to verify and maintain block quality during production.
  4. Precision and Accuracy: Machines are calibrated and designed to achieve precise block dimensions and shapes, ensuring compliance with construction regulations regarding tolerances and variations.
  5. Documentation and Certification: Manufacturers provide documentation certifying that their block-making machines comply with specific construction standards. This may involve obtaining certifications or adhering to industry-specific regulations.
  6. Safety Features: Machines are equipped with safety mechanisms to ensure compliance with occupational safety regulations. This includes emergency stop buttons, guards, and interlocks to prevent accidents during operation.
  7. Environmental Standards: Block-making machines are designed with environmental considerations in mind. They may incorporate features to minimize waste, reduce energy consumption, and adhere to environmental regulations related to emissions and sustainability.
  8. Testing and Validation: Manufacturers conduct testing and validation of the machines to ensure that the blocks produced meet or exceed the standards and regulations set by relevant construction authorities.
  9. Adaptability and Customization: Machines can be customized or adapted to produce blocks that align with specific regional or local construction regulations, catering to different building codes or preferences.

By integrating these measures into the design, production, and operation of block-making machines, manufacturers ensure that the blocks produced meet the required construction regulations and standards, ensuring their suitability and compliance for use in various construction projects.

What role does an edge tape machine in multi-axis CNC routing?

An edge tape machine is a specialized equipment used in woodworking and furniture manufacturing to apply edge banding or edge tape to the edges of panels, laminates, or boards. While it’s not directly associated with multi-axis CNC routing, it plays a complementary role in the finishing process after CNC routing and machining.

Here’s how an edge tape machine contributes to the overall process, particularly in conjunction with multi-axis CNC routing:

  1. Edge Finishing: After multi-axis CNC routing operations, the edges of wooden panels or boards may need finishing. The edge tape machine applies a thin strip of edge banding or tape to cover and protect the exposed edges, providing a clean and polished appearance.
  2. Precision Application: The edge tape machine is designed for precise and consistent application of edge banding materials along the edges of machined parts. It ensures uniformity in the application, contributing to the aesthetics and durability of the final product.
  3. Efficiency and Automation: Just like CNC routers, edge tape machines often feature automation and programmable settings. They can handle various edge banding materials and thicknesses, offering efficiency in applying edge tape to a range of workpieces.
  4. Versatility: Edge tape machines can handle different types of edge banding materials, including PVC, wood veneer, melamine, or ABS, allowing for versatility in finishing various materials routed by the CNC machine.
  5. Integration in Production Lines: In manufacturing setups, especially those with automated production lines, edge tape machines seamlessly integrate into the workflow following CNC routing operations. They contribute to the seamless transition from machining to finishing stages.
  6. Quality Enhancement: The application of edge banding using a dedicated machine ensures high-quality finishing, providing a clean, durable, and professional appearance to the edges of the machined parts or panels.

While an edge tape machine is not directly involved in the CNC routing process itself, it plays a crucial role in the post-processing and finishing stages, ensuring the final product meets quality standards and aesthetic requirements. Its integration into the production line helps complete the manufacturing process, following the precision routing performed by multi-axis CNC machines.

What are the primary steps involved in setting up and calibrating edge tape machine?

Setting up and calibrating an edge tape machine involves several steps to ensure its proper functioning and accurate application of edge banding materials.

Here are the primary steps involved in this process:

  1. Machine Inspection and Preparation:
    • Inspect the edge tape machine for any damage, wear, or issues that might affect its operation.
    • Ensure all components, including rollers, guides, heating elements (if applicable), and adhesive systems, are clean and in working condition.
  2. Material Preparation:
    • Prepare the edge banding materials (such as PVC, ABS, wood veneer, etc.) that will be used with the machine. Check material dimensions and compatibility with the machine.
    • If the edge banding material has an adhesive backing, ensure it is free of debris or contaminants.
  3. Machine Setup:
    • Adjust the machine’s settings, including feed speed, temperature (for heated systems), pressure rollers, edge tape machine and cutting mechanisms, based on the specific edge banding material and panel thickness.
    • Align the guides and rollers according to the width and thickness of the edge banding material to ensure precise application.
  4. Testing and Calibration:
    • Conduct test runs using scrap or test panels to calibrate the machine settings. This involves running a small piece of edge banding material through the machine to check alignment, feed accuracy, adhesive application, and trimming/cutting accuracy.
    • Make incremental adjustments to settings (such as pressure, temperature, feed speed) based on the test results until achieving the desired edge banding application quality.
  5. Edge Banding Application:
    • Once the machine is properly calibrated, begin the edge banding application process on actual workpieces or panels. Ensure that the panels are clean and free from dust or debris before applying the edge banding material.
  6. Quality Control and Fine-tuning:
    • Continuously monitor the edge banding application quality and make fine adjustments to machine settings as needed during actual production.
    • Conduct periodic checks to ensure consistent and accurate application of edge banding throughout the production run.
  7. Maintenance and Documentation:
    • Establish a maintenance schedule for the edge tape machine, including regular cleaning, lubrication, and replacement of worn parts.
    • Keep detailed records of calibration settings, adjustments made, and maintenance activities for future reference and troubleshooting.
  8. Operator Training:
    • Train operators thoroughly on operating procedures, safety protocols, and troubleshooting techniques related to the edge tape machine to ensure safe and efficient operation.

By following these steps and conducting thorough testing and calibration, the edge tape machine can be set up accurately to apply edge banding materials effectively, contributing to high-quality finished products in woodworking and furniture manufacturing processes.

Are there specific safety protocols for technicians working with ATC systems?

Absolutely, working with automatic tool changers (ATCs) in CNC routers requires adherence to strict safety protocols to minimize risks and ensure a safe working environment.

Here are some essential safety guidelines for technicians operating ATC systems:

  1. Training and Familiarization: Technicians should undergo comprehensive training specific to ATC operation and safety. They must be familiar with the equipment, its functions, emergency procedures, and safety protocols.
  2. Proper Attire: Wear appropriate personal protective equipment (PPE), including safety glasses, gloves, and protective clothing, to shield against potential hazards like flying debris, tool breakage, or contact with moving parts.
  3. Tool Inspection: Inspect tools regularly for damage, wear, or defects before inserting them into the ATC. Damaged or improperly installed tools can lead to accidents or malfunctions.
  4. Secure Workspace: Ensure the work area is clear of obstructions, and there’s adequate space for tool changes. Remove unnecessary items that could interfere with the movement of the ATC or pose tripping hazards.
  5. Follow Lockout/Tagout Procedures: Implement proper lockout/tagout procedures when performing maintenance, repairs, or adjustments on the ATC to prevent accidental start-up.
  6. Emergency Stop and Procedures: Familiarize yourself with the emergency stop functionality and know the procedures for stopping the machine immediately in case of an emergency or malfunction.
  7. Avoid Hand Placement: Never place hands or fingers near moving parts, especially during tool changes or when the ATC is in operation. Wait for the system to complete its cycle and come to a complete stop before approaching.
  8. Regular Maintenance: Follow manufacturer-recommended maintenance schedules and procedures to ensure the ATC operates optimally and safely.
  9. Tool Change Protocols: Adhere to established protocols for tool changes, ensuring that the ATC is properly aligned, tools are securely clamped, and the system is functioning correctly before resuming operation.
  10. Risk Assessment: Perform a thorough risk assessment of the work environment and processes involving the ATC to identify potential hazards and implement necessary controls.
  11. Supervision and Monitoring: Ensure that operations involving ATCs are supervised, and technicians are monitored, especially during initial use or training periods.
  12. Reporting and Incident Response: Encourage reporting of any malfunctions, near misses, or incidents related to the ATC system promptly. Establish protocols for investigating and responding to incidents.

These safety measures should be part of comprehensive safety policies and procedures within the workplace, automatic change tools cnc router factory aiming to protect technicians and ensure the safe operation of ATC-equipped CNC routers.

How does an ATC affect the overall workflow and production schedule?

An Automatic Tool Changer (ATC) significantly impacts the workflow and production schedule in a CNC (Computer Numerical Control) machining environment in several ways:

  1. Increased Efficiency: ATCs enhance efficiency by reducing downtime associated with manual tool changes. They enable automatic and rapid tool changes without the need for operator intervention, thereby optimizing machining time.
  2. Minimized Interruptions: Traditional manual tool changes require stopping the machining process, changing tools, and then restarting. ATCs minimize interruptions by swiftly changing tools during operations, reducing idle time and enhancing continuous machining.
  3. Enhanced Flexibility: ATCs allow for greater flexibility in machining operations. They enable the use of multiple tools and tool types within a single machining operation, providing versatility and enabling complex machining tasks without operator intervention.
  4. Improved Accuracy and Consistency: Automated tool changes ensure consistent tool positioning and installation accuracy. This consistency enhances the precision and quality of machined parts by reducing human error in tool changes.
  5. Optimized Production Scheduling: The faster tool changes facilitated by ATCs contribute to better production scheduling. Manufacturers can plan and execute jobs more efficiently, reducing overall lead times and meeting delivery deadlines more effectively.
  6. Reduced Labor Requirements: With ATCs, manual labor requirements for tool changes are significantly reduced. Operators can focus on other tasks, such as programming, quality control, or monitoring the machining process, leading to better resource utilization.
  7. Batch Production Benefits: For batch production or jobs involving multiple setups, ATCs are particularly advantageous. They facilitate quick transitions between different tools or operations, allowing for streamlined and efficient production runs.
  8. Adaptability to Complex Parts: ATCs enable the machining of complex parts that require multiple tools or tool changes. This capability is crucial for industries like aerospace or automotive manufacturing, where intricate parts are common.
  9. Increased Machine Utilization: ATCs maximize the utilization of CNC machines by reducing non-cutting time associated with tool changes, enabling machines to operate closer to their maximum capacity.
  10. Overall Workflow Optimization: Incorporating an ATC into CNC machining workflows optimizes the overall manufacturing process by reducing cycle times, enhancing throughput, and improving the overall efficiency of the production environment.

In essence, ATCs play a vital role in streamlining production workflows, reducing manual interventions, enhancing machining efficiency, and contributing to a more agile and productive manufacturing environment. Their implementation often leads to significant improvements in overall productivity and production schedule adherence.

How does montmorillonite contribute to soil fertility and agriculture?

Montmorillonite plays a significant role in soil fertility and agriculture due to its unique properties and contributions.

Here are some ways in which montmorillonite contributes to soil fertility and agricultural practices:

Cation Exchange Capacity (CEC): Montmorillonite has a high CEC, which refers to its ability to retain and exchange positively charged nutrients such as calcium, magnesium, potassium, and ammonium. This property allows montmorillonite to act as a reservoir for essential plant nutrients, making them available for uptake by plant roots.

Water Retention and Drainage: Montmorillonite has excellent water-holding capacity. It can absorb and retain significant amounts of water, making it available to plants during dry periods. Additionally, montmorillonite also promotes proper drainage, preventing waterlogging and reducing the risk of root rot.

Soil Structure Improvement: Montmorillonite has a plate-like structure with a high surface area. When mixed with soil, it helps improve soil structure by forming aggregates, enhancing soil porosity, and promoting better root penetration. This improves aeration, nutrient availability, and water movement in the soil.

Nutrient Stabilization: Montmorillonite can bind and stabilize nutrients, preventing them from being washed away or leached out of the soil. This reduces nutrient loss and enhances their availability to plants over an extended period.

pH Buffering: Montmorillonite has the ability to buffer soil pH. It can help maintain a stable pH level in the soil, preventing extreme acidity or alkalinity, which can negatively impact plant growth.

Disease Suppression: Montmorillonite has been found to have antimicrobial properties, which can help suppress certain soil-borne diseases and pathogens, promoting healthier plant growth.

Soil Erosion Control: Montmorillonite can be used as an additive in erosion control measures. When applied to sloping or erodible soils, it helps to stabilize soil particles, reduce surface runoff, and prevent soil erosion.

Overall, the presence of montmorillonite in soils contributes to improved soil fertility, nutrient retention, moisture management, montmorillonite supplier and enhanced plant growth. Its properties make it a valuable component in agricultural practices, soil amendments, and the development of sustainable farming techniques.

Are there any potential health concerns associated with montmorillonite exposure?

Montmorillonite is generally considered to have low toxicity and is considered safe for various applications. However, as with any substance, there are potential health concerns associated with exposure to montmorillonite, particularly in certain circumstances. Here are some factors to consider:

Inhalation of Dust: When montmorillonite is present in dry, powdered form, prolonged inhalation of the dust may cause respiratory irritation. This is more likely to occur in occupational settings where there is regular and significant exposure to airborne montmorillonite dust.

Skin Irritation: Direct contact with montmorillonite powder or suspensions may cause skin irritation, especially in individuals with sensitive skin. It is advisable to wash skin thoroughly if contact occurs.

Eye Irritation: Montmorillonite dust or solutions can cause eye irritation upon contact. If montmorillonite comes into contact with the eyes, it is important to flush them with clean water and seek medical attention if irritation persists.

Sensitization: In rare cases, some individuals may develop an allergic or hypersensitive reaction to montmorillonite. This can manifest as skin rashes, itching, or respiratory symptoms. If any allergic reactions occur, medical attention should be sought.

Ingestion: Ingesting small amounts of montmorillonite is generally considered safe. However, consuming large quantities may cause gastrointestinal discomfort, such as stomach upset or constipation. It is important to note that montmorillonite is not intended for ingestion as a dietary supplement.

It is worth mentioning that the risks associated with montmorillonite exposure are generally associated with high levels of exposure in occupational or industrial settings. In everyday use, such as in cosmetics or agricultural applications, when handled properly, the risks are minimal.

To minimize potential health risks:

Follow safety guidelines and use appropriate personal protective equipment when handling montmorillonite in a powdered or suspended form.
Avoid prolonged inhalation of montmorillonite dust and ensure adequate ventilation in workspaces.
Store montmorillonite products securely and out of reach of children.
Follow recommended handling and disposal practices provided by manufacturers.
If you have specific concerns about montmorillonite exposure or its use in a particular context, it is advisable to consult relevant safety data sheets, seek guidance from manufacturers, or consult with a health professional.

What level of precision and detail can be achieved with a plexiglass engraving machine?

A plexiglass engraving machine, depending on its specifications and capabilities, can achieve a high level of precision and detail in the engraving process.

Here are some factors that contribute to the precision and detail achievable with a plexiglass engraving machine:

Machine Resolution: The resolution of the engraving machine refers to the smallest unit of movement it can make. Machines with higher resolution can achieve finer details and smoother curves in the engravings.

Laser Power and Focus: The power output and focus of the laser used in the engraving machine play a significant role in achieving precision and detail. Higher laser power can result in deeper and more defined engravings, while a well-focused laser beam ensures sharp lines and intricate details.

Engraving Speed: The speed at which the engraving machine moves the laser across the plexiglass surface affects the level of detail. Slower speeds allow for more precise control, especially when engraving intricate designs.

Software and Design Tools: The software used to control the engraving machine plays a crucial role in achieving precision and detail. Advanced software allows for precise control of laser parameters, such as power, speed, and focus, enabling the creation of intricate designs.

Material Thickness: The thickness of the plexiglass being engraved can impact the level of detail achievable. Thicker materials may require multiple passes or adjustments to achieve the desired depth and sharpness.

With a well-calibrated and properly maintained plexiglass engraving machine, intricate designs, fine lines, small text, and complex patterns can be engraved with precision on plexiglass. However, it’s important to note that the level of precision and detail may vary depending on the specific machine, plexiglass engraving machine its capabilities, and the expertise of the operator. It is recommended to consult the manufacturer’s specifications and conduct tests to determine the machine’s capabilities for achieving the desired level of precision and detail.

What safety precautions should be followed when operating a plexiglass engraving machine?

When operating a plexiglass engraving machine, it is essential to follow proper safety precautions to protect yourself and ensure a safe working environment.

Here are some important safety measures to consider:

Read the Manual: Familiarize yourself with the manufacturer’s instructions and safety guidelines provided in the machine’s manual. Follow the recommended procedures for setup, operation, and maintenance.

Personal Protective Equipment (PPE): Wear appropriate PPE, such as safety glasses or goggles to protect your eyes from laser radiation and flying debris. Additionally, consider wearing gloves to protect your hands from sharp edges or hot surfaces.

Ventilation: Ensure proper ventilation in the work area to remove fumes or dust generated during the engraving process. Use local exhaust ventilation or work in a well-ventilated room to maintain air quality.

Fire Safety: Keep a fire extinguisher nearby and understand how to use it in case of emergencies. Avoid leaving the machine unattended while it is in operation, and be cautious of flammable materials in the vicinity.

Laser Safety Interlocks: Ensure that the engraving machine has appropriate safety interlocks and emergency stop features. Familiarize yourself with their location and functionality.

Material Compatibility: Verify that the plexiglass material being used is suitable for laser engraving. plexiglass engraving machine Some plastics may release toxic fumes or hazardous byproducts when engraved. Use materials specifically designed for laser engraving or consult the manufacturer’s recommendations.

Secure Workpiece: Securely fasten the plexiglass workpiece to prevent movement or vibrations during the engraving process. This ensures accurate and safe engraving.

Laser Beam Containment: Ensure that the laser beam is properly contained within the machine during operation. Avoid direct exposure to the laser beam and do not interrupt or tamper with the laser path.

Training and Supervision: Obtain proper training on the operation of the plexiglass engraving machine. If you are a beginner, consider working under the supervision of an experienced operator until you are confident in your abilities.

Regular Maintenance: Follow the manufacturer’s recommended maintenance schedule for the engraving machine. Regularly inspect and clean the machine to keep it in proper working condition.

It is important to note that these safety precautions are general guidelines, and specific safety requirements may vary depending on the model and specifications of the plexiglass engraving machine. Always refer to the machine’s manual and consult with the manufacturer for specific safety guidelines and procedures.

How often should I inspect the carrier roller?

Regular inspection of the carrier roller is important to ensure its proper functioning and longevity. The frequency of inspection will depend on a variety of factors, including the operating environment, the frequency and intensity of use, and the type of material being excavated. However, as a general guideline, it is recommended to inspect the carrier roller at least once every 250 operating hours or once a month, whichever comes first.

During the inspection, the carrier roller should be checked for any signs of wear or damage, including cracks, bends, or deformation. The roller should also be checked for any signs of wear on the shaft or bearings. If any damage or wear is detected, the carrier roller should be replaced immediately to prevent further damage to the undercarriage system.

In addition to regular inspections, proper maintenance of the carrier roller is also essential to ensure its longevity and performance. China DAEWOO Excavator Carrier Roller DH220 Manufacturers This may include regular lubrication of the roller, as well as cleaning and removing any debris or dirt that may accumulate around the roller.

Overall, regular inspection and maintenance of the carrier roller is an important part of excavator maintenance and can help to ensure the proper functioning and longevity of the undercarriage system.

What are some common causes of carrier roller damage?

The carrier roller is an important component of an excavator’s undercarriage system, and it can become damaged for a variety of reasons.

Here are some common causes of carrier roller damage:

Lack of lubrication: Proper lubrication is essential to reduce wear and tear on the carrier roller and prolong its lifespan. If the roller is not adequately lubricated, it can cause increased friction and heat, which can lead to damage or failure of the roller.

Environmental factors: The operating environment can have a significant impact on the lifespan of the carrier roller. Exposure to extreme temperatures, abrasive materials, or corrosive substances can lead to accelerated wear and tear on the roller.

Overloading: Overloading the excavator can cause increased stress on the undercarriage system, including the carrier roller. If the roller is not designed to support the weight of the excavator and the load, it can become damaged or fail.

Poor operating practices: Improper operating practices, such as driving the excavator over rough terrain or overloading the bucket, can cause increased stress on the undercarriage system and lead to damage or failure of the carrier roller.

Age and wear: Like any mechanical component, the carrier roller will naturally wear over time and eventually need to be replaced. Regular inspection and maintenance can help to prolong its lifespan and ensure proper functioning.

Overall, regular inspection and maintenance of the carrier roller and the entire undercarriage system is important to prevent damage and ensure proper functioning and longevity. It’s also important to follow proper operating practices and avoid overloading the excavator or exposing it to harsh operating environments.

How can I properly lubricate the carrier roller?

Proper lubrication of the carrier roller is essential to ensure its longevity and performance.

Here are the steps to properly lubricate the carrier roller:

Clean the roller: Before lubricating the carrier roller, it’s important to clean it thoroughly to remove any dirt, debris, or old lubricant. Use a scraper or wire brush to remove any debris, and then wipe the roller clean with a rag.

Choose the right lubricant: Select a high-quality lubricant that is specifically designed for use with heavy equipment. Avoid using automotive or household lubricants, as these may not provide the necessary protection and can actually cause damage to the roller.

Apply the lubricant: Apply the lubricant evenly to the roller and shaft, using a grease gun or other applicator tool. Ensure that the lubricant is evenly distributed and covers the entire surface of the roller.

Check for leaks: After lubricating the carrier roller, check for any signs of leaks or excess grease. If there is excess grease, wipe it away with a rag to prevent it from attracting dirt and debris.

Recheck regularly: Regularly check the carrier roller to ensure that it remains properly lubricated. Depending on the operating conditions and environment, it may be necessary to lubricate the roller more frequently.

Proper lubrication of the carrier roller can help to reduce wear and tear on the roller and prolong its lifespan. It’s important to follow the manufacturer’s recommendations for lubrication, China DAEWOO DH220 Supplier and to use the right type of lubricant for the specific model of excavator. Regular inspection and maintenance of the carrier roller and the entire undercarriage system is also essential to ensure proper functioning and longevity.

What are the signs of wear and tear on the carrier roller?

The carrier roller is an important component of an excavator’s undercarriage system, and any signs of wear and tear should be addressed promptly to prevent further damage.

Here are some common signs of wear and tear on the carrier roller:

Noise: A carrier roller that is worn or damaged may produce a grinding or squeaking noise when the excavator is in operation. This may be due to metal-on-metal friction or other issues with the roller.

Vibration: A worn or damaged carrier roller can cause increased vibration in the undercarriage system, which can lead to further damage if left unaddressed.

Uneven wear: Inspect the carrier roller for uneven wear patterns, which can indicate that the roller is not functioning properly. Uneven wear can also be a sign of misalignment or other issues with the undercarriage system.

Cracks or deformation: Check the carrier roller for any signs of cracks, bending, or deformation, which can indicate that the roller has been damaged and needs to be replaced.

Increased track wear: A carrier roller that is not functioning properly can cause increased wear on the track, which can lead to premature failure of the track and other undercarriage components.

If you notice any of these signs of wear and tear on the carrier roller, it is important to address the issue promptly to prevent further damage to the undercarriage system. Regular inspection and maintenance of the carrier roller and the entire undercarriage system is also important to ensure proper functioning and longevity.

Use Baby Diaper Cake to Make a Baby Shower Interesting

A baby diaper cake is a creative and practical way to use diapers as a centerpiece for a baby shower.

Here are some tips on how to make a baby diaper cake and use it to make a baby shower interesting:

Choose the right size: Decide on the size of the diaper cake you want to make, depending on the number of diapers you have and the size of the party. A three-tier diaper cake is a popular choice and requires around 50-60 diapers.

Gather supplies: You will need diapers, rubber bands, ribbon, and decorative items such as stuffed animals, baby toys, and pacifiers.

Roll the diapers: Roll each diaper tightly and secure it with a rubber band. Continue until you have enough rolled diapers to create the tiers of the cake.

Create the tiers: Use a cake board or cardboard circle as the base of the cake. Arrange the rolled diapers in a circle on the board and secure with a large rubber band. Repeat this process for the second and third tiers, making each tier slightly smaller than the previous one.

Decorate the cake: Wrap ribbon around each tier of the cake to cover the rubber bands. Add decorative items such as stuffed animals, baby toys, and pacifiers to the cake.

Use as a centerpiece: Place the diaper cake in the center of the table as a centerpiece. It can also be used as a gift for the new parents after the baby shower.

A baby diaper cake is not only a fun and creative way to celebrate the arrival of a new baby, baby diaper manufacturers but it is also a practical and useful gift for the new parents. It can also be used as a conversation starter and a fun activity for guests at the baby shower.

What are some other creative baby shower decorations?

There are many creative baby shower decorations that can add a special touch to the celebration.

Here are a few ideas:

Balloon garlands: Create a stunning backdrop or photo booth area with a balloon garland in the baby shower colors. You can make one yourself or purchase a pre-made garland.

Baby photos: Ask guests to bring a baby photo of themselves and display them on a bulletin board or string them up with clothespins as a fun guessing game.

Floral arrangements: Use fresh flowers or paper flowers in the baby shower colors to create centerpieces or decorate around the room.

Diaper wreaths: Create a wreath made of diapers, baby items, and ribbon to hang on the door or use as a centerpiece.

Onesie banner: Decorate the room with a banner made of onesies in different colors and patterns.

Baby mobiles: Create a mobile made of paper or fabric baby animals, stars, or other themed shapes to hang over the gift table or a designated area.

Tassel garlands: Use tissue paper or ribbon to create tassel garlands in the baby shower colors to hang around the room.

Personalized favors: Create personalized favors such as decorated cookies, candles, or mini succulents to give to guests as a thank you for attending.

Remember to choose decorations that fit the baby shower theme and style, and to have fun with it! A well-decorated baby shower can create a warm and welcoming atmosphere and make the celebration even more special for the parents-to-be and their guests.

What is the maximum temperature a 1-inch silicone heater hose can withstand?

The maximum temperature that a 1-inch silicone heater hose can withstand depends on the specific brand and model of the hose, as well as the type of fluid or substance being transferred through the hose. In general, most high-quality silicone heater hoses are designed to withstand temperatures between -65°F and 350°F (-54°C to 177°C).

However, it’s important to note that the maximum temperature a silicone heater hose can withstand may be affected by other factors such as the duration of exposure, the pressure of the fluid being transferred, and the presence of any chemicals or corrosive substances. In some cases, special high-temperature silicone heater hoses may be required for extremely high-temperature applications.

It’s important to always follow the manufacturer’s specifications and guidelines for the specific hose you are using, and to regularly inspect the hose for signs of wear or damage that could compromise its ability to withstand high temperatures. If you are unsure about the maximum temperature a silicone heater hose can withstand, consult with a qualified professional or the manufacturer of the hose for guidance.

What are some factors that could affect the maximum temperature a silicone heater hose can withstand?

There are several factors that can affect the maximum temperature that a silicone heater hose can withstand, including:

Fluid temperature: The temperature of the fluid or substance being transferred through the hose can have a significant impact on the maximum temperature the hose can withstand. 1 inch silicone heater hose High-temperature fluids can cause the hose to degrade more quickly and reduce its ability to withstand extreme temperatures.

Pressure: The pressure of the fluid being transferred through the hose can also affect its maximum temperature rating. Higher pressures can cause the hose to expand or contract, which can reduce its ability to withstand high temperatures.

Duration of exposure: The length of time that the hose is exposed to high temperatures can also affect its maximum temperature rating. Longer exposure times can cause the hose to degrade and reduce its ability to withstand extreme temperatures.

Chemical exposure: Exposure to certain chemicals or corrosive substances can also affect the maximum temperature rating of the hose. Chemicals can cause the hose to degrade more quickly and reduce its ability to withstand high temperatures.

Installation: Proper installation of the hose is important to ensure that it can withstand high temperatures. If the hose is installed incorrectly or is under excessive stress, this can reduce its ability to withstand high temperatures.

Age and wear: As a silicone heater hose ages, it may become more prone to failure and may have a reduced maximum temperature rating. Wear and tear, such as abrasions or cuts, can also reduce the hose’s ability to withstand high temperatures.

It’s important to consider these factors when selecting a silicone heater hose for your application and to regularly inspect the hose for signs of wear or damage that could compromise its ability to withstand high temperatures. If you are unsure about the maximum temperature rating of a silicone heater hose, consult with a qualified professional or the manufacturer of the hose for guidance.

What are the most durable markers for everyday use?

The cheapest markers are typically those that are sold in bulk or in large packages, and are often found in discount stores or online retailers.

Some examples of the cheapest markers include:

Crayola Classic Broad Line Markers: These markers are sold in packs of 10 or more and are available at most discount stores and online retailers.

RoseArt SuperTip Markers: These markers are sold in packs of 10 or more and are available at most discount stores and online retailers.

Bazic Bright Color Markers: These markers are sold in packs of 6 or more and are available at most discount stores and online retailers.

Jot Washable Markers: These markers are sold in packs of 8 or more and are available at Dollar Tree stores and online retailers.

Up&Up Washable Markers: These markers are sold in packs of 8 or more and are available at Target stores and online retailers.

It’s important to note that while these markers may be the cheapest option, they may not always offer the same quality or performance as more expensive markers. Additionally, some cheaper markers may not be washable or may have a shorter lifespan. cheapest markers It’s important to consider the specific needs and requirements of the intended use when selecting markers, and to choose a brand and type that offers the desired level of quality and performance.

The most durable markers for everyday use are those that are designed to withstand heavy use, pressure, and exposure to various environmental conditions.

Here are some of the most durable markers for everyday use:

Sharpie Permanent Markers: Sharpie markers are known for their durability and long-lasting performance. They are designed to be water-resistant, fade-resistant, and quick-drying, making them ideal for use in a variety of settings.

Staedtler Lumocolor Permanent Markers: Staedtler markers are designed to be smudge-proof, water-resistant, and lightfast, making them ideal for use in harsh environments or on surfaces that are exposed to the elements.

Pilot Super Color Markers: Pilot markers are designed to be permanent and water-resistant, with a durable fiber-tip that can withstand heavy use and pressure.

Bic Mark-It Permanent Markers: Bic markers are designed to be fade-resistant, water-resistant, and acid-free, making them ideal for use in a variety of settings.

Uni Posca Paint Markers: Uni Posca markers are designed to be water-resistant, fade-resistant, and opaque, with a durable tip that can withstand heavy use and pressure.

Overall, the most durable markers for everyday use are those that are designed to be permanent, water-resistant, and fade-resistant, with a durable tip that can withstand heavy use and pressure. It’s important to choose a marker that is appropriate for the specific use and environment, as well as to follow the manufacturer’s recommended guidelines for storage and use to ensure optimal performance and longevity.

Design a site like this with WordPress.com
Get started